非最大抑制算法是如何工作的?
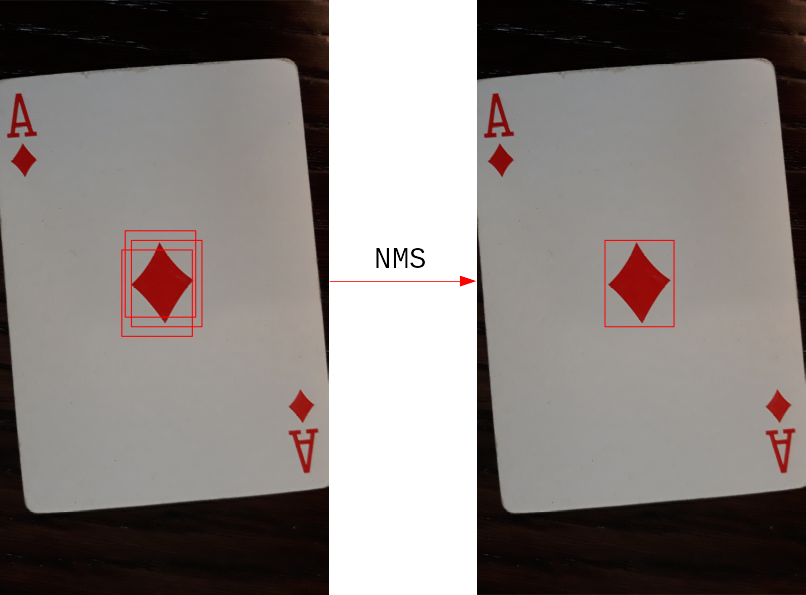
简介你曾经使用过物体检测算法吗?如果是,则很有可能你已经使用了非最大抑制算法。也许这是你使用的深度学习模式的一部分,你甚至没有注意到。因为即使是非常复杂的算法也会面临这个问题,它们会多次识别同一个对象
简介
你曾经使用过物体检测算法吗?如果是,则很有可能你已经使用了非最大抑制算法。也许这是你使用的深度学习模式的一部分,你甚至没有注意到。因为即使是非常复杂的算法也会面临这个问题,它们会多次识别同一个对象。今天,想向你展示非最大抑制算法是如何工作的,并提供一个python实现。首先向你展示,边界框是包围图像中检测到的对象的矩形。然后我将介绍非最大抑制的代码。该算法逐个删除冗余的边界框。它通过移除重叠大于阈值的框来实现。边界框我们使用边界框来标记图像中已识别出感兴趣对象的部分。
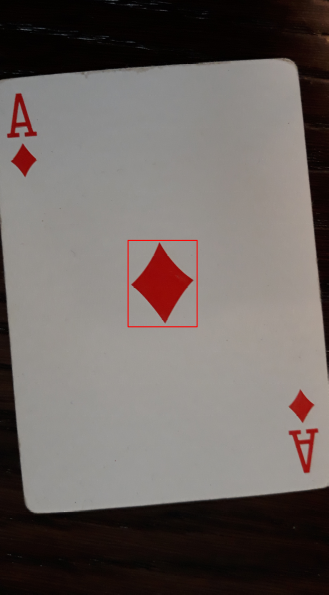
在本例中,要识别的对象是方块A中的大方块。边界框始终是垂直的矩形。因此,我们只需要存储所有边界框的左上角和右下角。
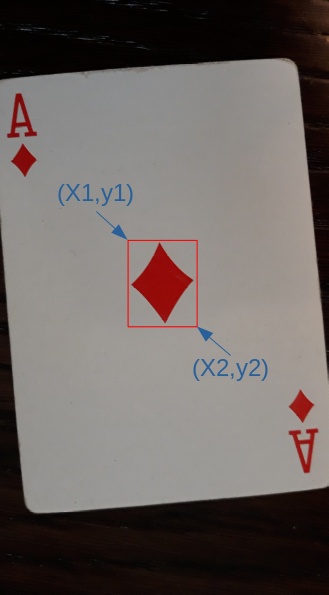
当使用目标检测方法时,同一个目标在稍有不同的区域被多次检测到的情况经常发生。

大多数情况下,我们只想检测一次对象。为了实现这一点,我们通过应用非最大值抑制来删除冗余的边界框。非最大抑制现在,向你展示了执行非最大抑制的完整功能代码,这样你就有了一个概览。但别担心,我会带你看一下代码。
def NMS(boxes, overlapThresh = 0.4):
# 返回一个空列表,如果没有给出框
if len(boxes) == 0:
return []
x1 = boxes[:, 0] # x左上角的坐标
y1 = boxes[:, 1] # y左上角的坐标
x2 = boxes[:, 2] # x右下角的坐标
y2 = boxes[:, 3] # y右下角的坐标
# 计算边界框的面积,并对边界进行排序
# 边框的右下角y坐标
areas = (x2 - x1 + 1) * (y2 - y1 + 1) # 需要加1
# 开始时所有框的索引。
indices = np.arange(len(x1))
for i,box in enumerate(boxes):
# 创建临时索引
temp_indices = indices[indices!=i]
# 找出相交方块的坐标
xx1 = np.maximum(box[0], boxes[temp_indices,0])
yy1 = np.maximum(box[1], boxes[temp_indices,1])
xx2 = np.minimum(box[2], boxes[temp_indices,2])
yy2 = np.minimum(box[3], boxes[temp_indices,3])
# 找出交叉框的宽度和高度
w = np.maximum(0, xx2 - xx1 + 1)
h = np.maximum(0, yy2 - yy1 + 1)
# 计算重叠的比例
overlap = (w * h) / areas[temp_indices]
# 如果实际的边界框与其他框的重叠部分大于阈值,删除它的索引
if np.any(overlap) > treshold:
indices = indices[indices != i]
# 只返回其余索引的方框
return boxes[indices].astype(int)
非最大抑制(NMS)函数接收一组框,阈值默认值0.4。
def NMS(boxes, overlapThresh = 0.4):
框的数组必须进行组织,以便每行包含不同的边界框。
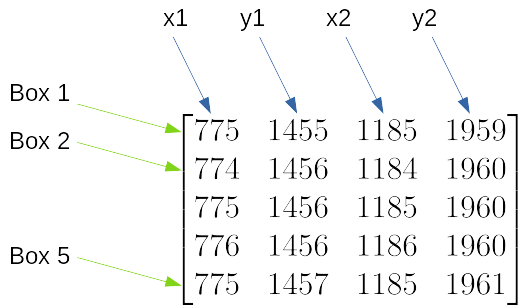
如果它们重叠更多,则两个中的一个将被丢弃。重叠树阈值为0.4意味着两个矩形可以共享其40%的面积。矩形的面积是用它的宽度乘以它的高度来计算的。我们增加1,因为边界框在起点坐标和终点坐标上都有一个像素。
areas = (x2 - x1 + 1) * (y2 - y1 + 1)
然后,我们为所有框创建索引。稍后,我们将逐个删除索引,直到只有对应于非重叠框的索引。
indices = np.arange(len(x1))
在循环中,我们迭代所有框。对于每个框,我们检查它与任何其他框的重叠是否大于阈值。如果是这样,我们将从索引列表中删除该框的索引。
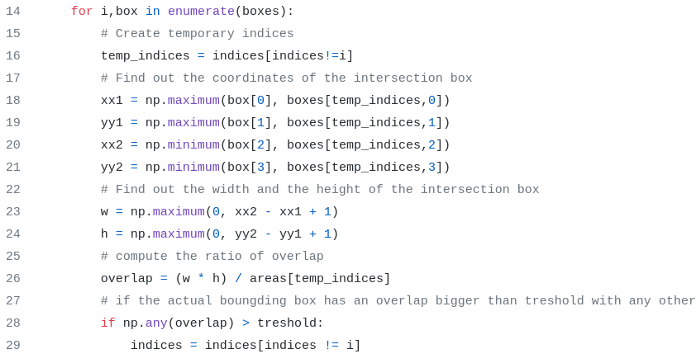
我们创建包含方框索引的索引,其中不包含box[i]的索引。
temp_indices = indices[indices!=i]
为了计算重叠,我们首先计算相交框的坐标。这段代码是矢量化的,以加快速度,我们计算长方体[i]与其他长方体的交点。
xx1 = np.maximum(box[0], boxes[temp_indices,0])
yy1 = np.maximum(box[1], boxes[temp_indices,1])
xx2 = np.minimum(box[2], boxes[temp_indices,2])
yy2 = np.minimum(box[3], boxes[temp_indices,3])
这可能有点混乱,但零点在左上角。因此,我们通过选择????1及????1的最小值,????2及????2的最大值来获得相交框的坐标。
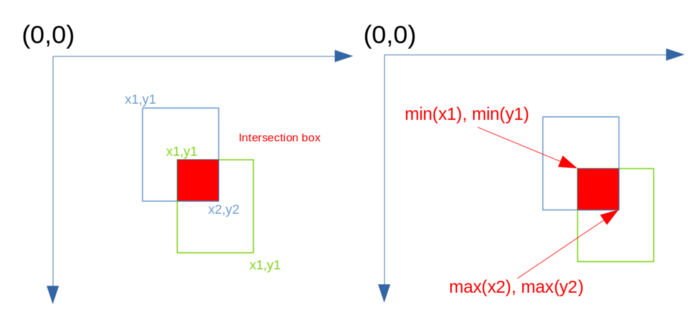
然后计算相交框的宽度和高度。我们取最大值0和计算的宽度和高度,因为负的宽度和高度会扰乱重叠的计算。
w = np.maximum(0, xx2 - xx1 + 1)
h = np.maximum(0, yy2 - yy1 + 1)
重叠就是相交框的面积除以边界框的面积。在我们的例子中,所有边界框的大小都相同,但该算法也适用于大小不同的情况。
overlap = (w * h) / areas[temp_indices]
然后,如果box[i]与任何其他框的重叠大于treshold,则我们从剩余的索引中排除索引i。
if np.any(overlap) > treshold:
indices = indices[indices != i]
然后,我们返回带有未删除索引的框。像素坐标必须是整数,所以我们转换它们只是为了安全。
return boxes[indices].astype(int)
基于模板匹配的目标检测你可能会问自己,我最初是如何得到这些边界框的。我使用了一种叫做模板匹配的简单技术。你只需要一个图像和一个模板,即你要搜索的对象。我们的形象将是方块A。
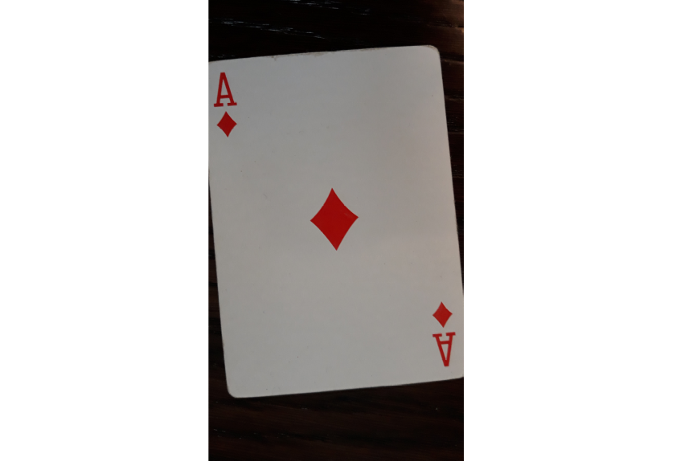
我们的模板将是图像中间的方块。
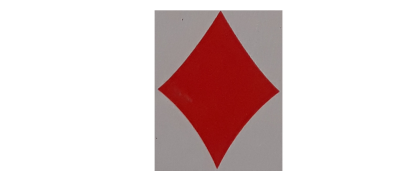
请注意,模板的方向和大小(以像素为单位)必须与要在图像中检测的对象大致相同。
我们需要opencv。如果你还没有,可以在终端中安装。
pip install opencv-python
我们导入cv2。
import cv2
要执行模板匹配并从中生成边界框,我们可以使用以下函数。
def bounding_boxes(image, template):
(tH, tW) = template.shape[:2] # 获取模板的高度和宽度
imageGray = cv2.cvtColor(image, 0) # 将图像转换为灰度
templateGray = cv2.cvtColor(template, 0) # 将模板转换为灰度
result = cv2.matchTemplate(imageGray, templateGray, cv2.TM_CCOEFF_NORMED) # 模板匹配返回相关性
(y1, x1) = np.where(result >= treshold) # 对象被检测到,其中相关性高于阈值
boxes = np.zeros((len(y1), 4)) # 构造一个零数组
x2 = x1 + tW # 用模板的宽度计算x2
y2 = y1 + tH # 计算y2与模板的高度
# 填充边框数组
boxes[:, 0] = x1
boxes[:, 1] = y1
boxes[:, 2] = x2
boxes[:, 3] = y2
return boxes.astype(int)
cv2.matchTemplate函数返回图像不同部分与模板的相关性。
然后,我们选择图像的部分,其中相关性在阈值之上。
(y1, x1) = np.where(result >= treshold)
我们还需要一个函数将边界框绘制到图像上。
def draw_bounding_boxes(image,boxes):
for box in boxes:
image = cv2.rectangle(copy.deepcopy(image),box[:2], box[2:], (255,0,0), 3)
return image
完整代码
import cv2
import pyautogui
import pyautogui
import cv2
import numpy as np
import os
import time
import matplotlib.pyplot as plt
import copy
def NMS(boxes, overlapThresh = 0.4):
# 返回一个空列表,如果没有给出框
if len(boxes) == 0:
return []
x1 = boxes[:, 0] # x左上角的坐标
y1 = boxes[:, 1] # y左上角的坐标
x2 = boxes[:, 2] # x右下角的坐标
y2 = boxes[:, 3] # y右下角的坐标
# 计算边界框的面积,并对边界进行排序
# 边框的右下角y坐标
areas = (x2 - x1 + 1) * (y2 - y1 + 1) # 需要加1
# 开始时所有框的索引。
indices = np.arange(len(x1))
for i,box in enumerate(boxes):
# 创建临时索引
temp_indices = indices[indices!=i]
# 找出相交方块的坐标
xx1 = np.maximum(box[0], boxes[temp_indices,0])
yy1 = np.maximum(box[1], boxes[temp_indices,1])
xx2 = np.minimum(box[2], boxes[temp_indices,2])
yy2 = np.minimum(box[3], boxes[temp_indices,3])
# 找出交叉框的宽度和高度
w = np.maximum(0, xx2 - xx1 + 1)
h = np.maximum(0, yy2 - yy1 + 1)
# 计算重叠的比例
overlap = (w * h) / areas[temp_indices]
# 如果实际的边界框与其他框的重叠部分大于阈值,删除它的索引
if np.any(overlap) > treshold:
indices = indices[indices != i]
# 只返回其余索引的方框
return boxes[indices].astype(int)
def bounding_boxes(image, template):
(tH, tW) = template.shape[:2] # 获取模板的高度和宽度
imageGray = cv2.cvtColor(image, 0) # 将图像转换为灰度
templateGray = cv2.cvtColor(template, 0) # 将模板转换为灰度
result = cv2.matchTemplate(imageGray, templateGray, cv2.TM_CCOEFF_NORMED) # 模板匹配返回相关性
(y1, x1) = np.where(result >= treshold) # 对象被检测到,其中相关性高于阈值
boxes = np.zeros((len(y1), 4)) # 构造一个零数组
x2 = x1 + tW # 用模板的宽度计算x2
y2 = y1 + tH # 计算y2与模板的高度
# 填充边框数组
boxes[:, 0] = x1
boxes[:, 1] = y1
boxes[:, 2] = x2
boxes[:, 3] = y2
return boxes.astype(int)
def draw_bounding_boxes(image,boxes):
for box in boxes:
image = cv2.rectangle(copy.deepcopy(image),box[:2], box[2:], (255,0,0), 3)
return image
if __name__ == "__main__":
time.sleep(2)
treshold = 0.8837 # 关联阈值,以便识别一个对象
template_diamonds = plt.imread(r"templates/ace_diamonds_plant_template.jpg")
ace_diamonds_rotated = plt.imread(r"images/ace_diamonds_table_rotated.jpg")
boxes_redundant = bounding_boxes(ace_diamonds_rotated, template_diamonds) # 计算边界盒
boxes = NMS(boxes_redundant) # 删除多余的包围框
overlapping_BB_image = draw_bounding_boxes(ace_diamonds_rotated,
boxes_redundant) # 使用所有多余的边框绘制图像
segmented_image = draw_bounding_boxes(ace_diamonds_rotated,boxes) # 在图像上绘制边界框
plt.imshow(overlapping_BB_image)
plt.show()
plt.imshow(segmented_image)
plt.show()
结论
我们可以使用非最大值抑制来删除冗余的边界框。它们是多余的,因为它们多次标记同一对象。
NMS算法利用相交三角形的面积计算三角形之间的重叠。如果边界框与任何其他边界框的重叠高于阈值,则将删除该边界框。
?原文标题:非最大抑制?


